Showing posts with label chez panisse. Show all posts

CHICKEN WITH 40 GARLIC CLOVES

It's gotten so cold and blustery these past two weeks - once the sun goes down, all I want to do is cozy up with my little family for a warm meal and go to bed nice and early. These long dark evenings suit my homebody tendencies.

This easy chicken dish, from Alice Waters' fantastic new cookbook Art of Simple Food II, is just the kind of comforting one-pot main that calls my name this time of year. The chicken is tender, moist and infused with a subtle herby garlic flavor - plus all those roasted garlic cloves are heavenly squeezed onto little toasts. And oh my is the sauce delish... you can't help but mop it up with a smile on your face.

As Alice suggests, you'll only need a simple arugula salad (sauteed spinach is also nice) and toasted bread on the side and you're done. Family meal accomplished.

INGREDIENTS from Alice Waters' Art of Simple Food II
printable recipe
  • 4 chicken legs, or one whole chicken cut into pieces
  • sea salt
  • freshly ground black pepper
  • olive oil
  • 40 unpeeled cloves garlic (from 3-4 heads)
  • 10 sprigs fresh thyme 
  • 1 bay leaf
  • for serving: toasted slices of crusty bread {Bay Area GF folks: Mariposa baguettes are quite nice here}; simple arugula salad or sauteed spinach

Note: If possible, generously season the chicken with salt and pepper the night before cooking.

Heat two tablespoons olive oil in a large cast iron skillet over medium-high heat. First, deeply brown the skin side of the chicken - 10-12 minutes. Flip the pieces and brown the underside for another 4 minutes or so. (In order not to crowd the chicken pieces, I do the browning in a couple of batches.)

Preheat oven to 375.

While the chicken is browning, separate garlic cloves leaving their skins on but removing excess papery skins. Place 40 individual garlic cloves in the bottom of a lidded baking dish. Add thyme sprigs, a bay leaf and 3 tablespoons of olive oil. Toss to coat.

When the chicken is nicely browned, nestle it on top of the garlic and herbs. Cover the pan with foil, then the lid. Place pan on the middle rack of your hot oven. After 50 minutes, take off the lid and foil and let the chicken cook another 10 minutes to crisp the skin a bit.

Serve slices of toasted rustic bread with the chicken to dip into the delectable juices in the bottom of the pan.

Serves 4

Wishing you all warm, peaceful, healthy holidays!!!!

SLOW COOKED SALMON WITH MEYER LEMON RELISH


Today, I want to share something fun and summery - just the kind of recipe we all could use in our repertoire - an easy, scrumptious dish to feed a family, which can easily be doubled or tripled to serve a crowd. When we first made this Chez Panisse slow cooked salmon recipe a decade or two ago, I was wowed by its simplicity and honestly, I can't believe it has taken me this long to share it here. Extremely low heat and gentle moisture (provided by a little pan of water at the bottom of the oven) make for the most tender and succulent fish imaginable!

The heavenly Meyer lemon relish also comes from Chez Panisse - it's fresh, tangy, and slightly sweet thanks to the the natural sugars in Meyer lemons. I think the relish would be great with all sorts of seafood and its bright flavors make it a perfect companion to the buttery rich slow cooked salmon.


It's hard for me to believe we're deep into July already. I turned in my manuscript last month  (woo-hoo!) and I have to admit, I've felt spent. I put every droplet of creative juice and inspiration into the book. When I finished I was totally euphoric, but quickly I crashed - my creative well felt fully tapped. So, mostly I've let myself be slow and lazy these past few weeks: I've slept a lot and savored quiet time with friends, family, P, and the kiddos.

After being away and having some serious downtime, I'm itching to get back to the kitchen and cook again with all of you. I've missed you guys!!

INGREDIENTS barely adapted from Alice Waters' Chez Panisse Cafe Cookbook
{printable recipe}

SALMON:
  • 1 center cut King salmon fillet (1.25 - 1.5 pounds)
  • olive oil
  • sea salt
  • freshly ground black pepper

MEYER LEMON RELISH:
  • 1 large shallot, minced
  • 1 tablespoon white wine vinegar or lemon juice
  • sea salt
  • 1 large Meyer lemon
  • 1/4 cup olive oil (the original recipe calls for 1/2 cup, but 1/4 cup seems like more than enough to me)
  • 2 tablespoons chopped parsley
  • freshly ground black pepper

Preheat your oven to 200 degrees. Place a baking dish filled half way with water on the lowest rack of your oven, making for a nice moist environment for the salmon to cook.

Lay the intact salmon fillet on a lightly oiled baking sheet. Brush the salmon with a little more olive oil. Salt generously and sprinkle with freshly ground black pepper. Transfer salmon to the warm oven. It should take between 45 minutes to 1 hour for the salmon to cook, depending on the size and thickness of your fillet. You can tell the salmon is done when the fish feels just firm to the touch and the juices are starting to break through the surface. Alice says you can serve the salmon right away or let it rest for up to 3 hours before serving. (Doesn't that sound helpful for a dinner party you want to prep in advance?)

While the salmon is cooking, make your Meyer lemon relish: first, in a small bowl, macerate shallot for 10-15 minutes in vinegar or lemon juice with a pinch of sea salt. Next, (leaving the skin on) cut lemon into 8 wedges. Remove seeds and cut out the core. Cut wedges in half again and slice very thin. Add the slivers of lemon to the macerated shallots. Add olive oil and parsley. Season with sea salt and freshly ground black pepper to taste.


When you're ready to eat, use your hands to break the salmon into chunks and serve with the Meyer lemon relish. YUM!


Serves 4


RUSTIC APPLE TART

Simple pleasures. This is what it's all about for me these days. When P, the kids, and I were on the road last year, slowness was our theme. Action and adventure does not describe our travel style - we had tons of family time and savored it deeply. I really believe the serenity of our time away added years back onto my life.

I am trying to figure out ways to integrate this attitude into our American lives. Lilah still finds great happiness in imaginary play and collecting twigs and flowers. Otis now goes to our local middle school and only gets in the car once in while.  Paul and I are trying to limit our commitments and spend lots of time at home enjoying our kids. Little things.

What does this have to do with food? In our family, where much of life revolves around eating, this means taking time to harvest blackberries and picking apples with friends on their bucolic land in West Sonoma County.

Rach and Justin invited a slew of us to spend the day with them. It was true Indian summer. The leaves had started falling, a bit of crispness cooled the air while still being warm enough for kids to swim, pluck juicy concord grapes from the vine, and pick apples... Life is good.


I like how uncomplicated this apple tart is - just apples on buttery pastry with a sprinkle of sugar. Simple pleasure. But I also enjoyed gussying this apple tart up a little bit with a drizzle with Homemade Caramel Sauce and voila .... Caramel Apple Tart, anyone?


INGREDIENTS adapted from David Tanis' Platter of Figs
(printable recipe)


Prepare your dough as per the instructions here. A couple of notes:

First, you only need half of the recipe for the pastry dough for this recipe. Have fun making a tart of your choice with the other half.

Second, please don't roll the dough too thin or the edges get pretty charred before the apples can cook all the way. (Tanis suggests rolling the dough into a 16x11 inch rectangle. I had more success when I made a thicker 11x6 inch oval of dough.)

Place the rolled out dough (on a parchment-lined baking sheet) into the fridge while you prep your apples.

Preheat oven to 375.

Peel and core apples and slice them thin. Take the prepared dough from the fridge. Lay the apples on the dough in long layered rows. ( If you aren't going to serve your tart until later, Tanis suggests covering the prepared tart in the fridge for up to 8 hours.)

Sprinkle Turbinado sugar over the apples and pastry. Bake in the oven for 30-40 minutes until the pastry is golden brown and the apples are tender.

We found the tart to be most delicious when served warm and drizzled with caramel sauce. When we ate the leftovers, we'd quickly warm up a slice in the oven before noshing.

Enjoy!


What else is cooking?


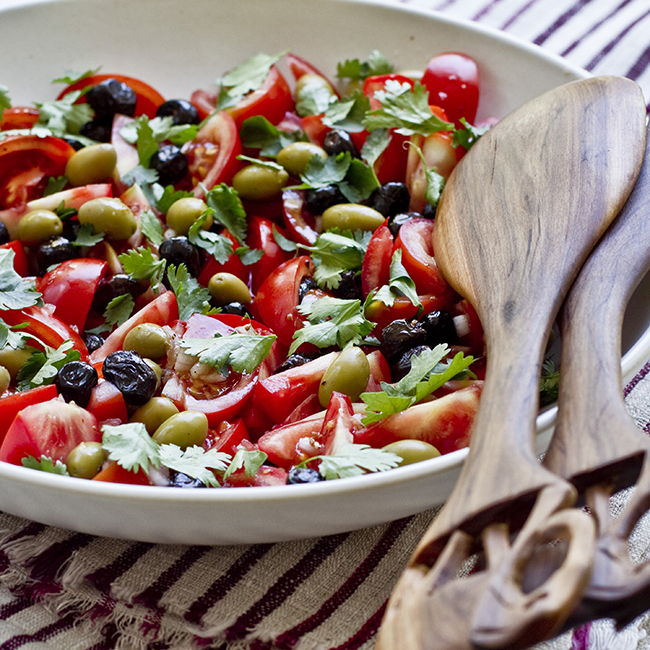
TOMATO SALAD WITH OLIVES + CORIANDER


It's that time of year..... juicy red tomatoes are everywhere! I cannot take a trip to Monterey Market without bringing home bushel of the beauties. Our go-to August tomato salad is the classic Caprese and we eat it a couple times a week. I'm not complaining, but it is also nice to try something new. With meaty heirlooms, sweet cherries, and endless varietals temping us in the late summer, we are always searching for tomato recipes to try in late summer.

Once again David Tanis is here to help out in my kitchen. His tomato salad with olives and coriander is respectful of rich flavor that tomatoes have to offer and his salad pays great tribute to the ingredient. Tomatoes are the well-deserved star of the recipe. Tanis's addition of green and black olives, as well as fresh cilantro leaves and toasted coriander seeds, is a refreshing twist on the tomato dishes we usually make. Paul oohed and awed and ate huge plates of the salad. I am happy to have yet another excuse to buy up more of those gorgeous tomatoes!

INGREDIENTS adapted from David Tanis' Heart of the Artichoke
(printable recipe)
  • 1/4 cup finely diced red onions or shallot
  • 1 clove garlic, smashed to a paste with a little salt
  • 2 tablespoons red wine vinegar
  • salt and pepper
  • 1/2 cup olive oil
  • 1 teaspoon coriander seed
  • pinch of cayenne
  • 2 pounds ripe tomatoes
  • 1/2 Picholine or other good green olives (not pitted)
  • 1/2 cup oil cured black olives (not pitted)
  • 1 cup cilantro leaves, roughly chopped
 

In a small bowl or cup, combine the onions, garlic, and vinegar. Drizzle in the olive oil, while whisking to emulsify dressing.

In a small skillet, toast the coriander seeds over medium-high heat.  After a few minutes, when you start to smell the coriander, remove the seeds from the pan. Using a mortar and pestle, or a spice grinder, grind the coriander and add to the dressing. Add the cayenne as well at this point.

Slice the tomato into thick pieces or wedges and transfer to a serving platter or bowl. Season with salt. Sprinkle the olives over the top. Drizzle on the dressing. And scatter the cilantro leaves over the salad. Add additional salt and pepper to taste.

Enjoy!


FRESH BERRY DIGESTIF


I am on a David Tanis kick. I loved his platter of figs, and the first cookbook I bought after our travels, is heart of the artichoke. I made two of Tanis' recipes already today and have the fixings for another for tonight's dinner. I so appreciate that many of the dishes are super simple and quick to toss together. Tanis is great company in the kitchen.

Paul and I have been intrigued by the idea of making our own spirits, ciders, and beers. We have yet to take the plunge and brew our own, but I thought I'd get my toes wet by trying Tanis' Digestivo with Fresh Berries.

I think serving this berry digestif to dinner party guests would be a fun end to a meal. Or why not take a large jam jar full of the rosy concoction as a hostess gift, next time you are invited to eat at someone else's table.


INGREDIENTS from David Tanis' heart of the artichoke
(printable recipe)
  • 1 cup fresh berries (Tanis suggests a mix of raspberries and blackberries)
  • 2 tablespoons sugar
  • 2 cups of vodka or grappa

Place washed berries in a bowl with 2 tablespoons of sugar. Crush the berries and sugar between your fingers to combine. Pour vodka (or grappa) over the sugar/berry mixture. Stir. Cover and refrigerate for at least a few hours before serving.

Serve the digestif in small glasses. Use a spoon or small ladle to scoop some of the crushed berries into each glass. I would serve the digestif with tiny spoons so that everyone can scoop up the boozy berries. Why waste such deliciousness?

By the way... we also mixed the berry vodka with a little tonic for a delightful cocktail. Yum!


NECTARINE SHERBET


After a magical year-long travel adventure with my family, I was kinda scared to come home and have it all end.

But now that I am here in our Berkeley house, it feels sooooo good.... seeing friends and family, sleeping in my cushy bed, checking out my jungle-like backyard. And being the food-obsessed person I am, I am blown away by the abundance of good eats. I have always known what a special, lush food world we have here in the Bay Area, but after being away for a year, I am stunned to come back to this food-lovers paradise.

Every trip to Monterey Market is a dream of stone fruits, juicy berries, countless herbs, tomatoes, cheeses, farm eggs. It is almost too much deliciousness for me to take in. We've been going to the market every day, buying just enough ingredients to toss together summer salads, morning fruit, and simple dinners. My cooking is a little rusty (a few steps beyond rustic!) after being away and having really limited access to ingredients and kitchen supplies. Now, with sharp knives, a working stove, a spacious fridge, and endless gorgeous produce, I am getting back into my old Berkeley cooking groove and it feels damned good.

In honor of summer and my love for Berkeley, I give you this homecoming recipe from Chez Panisse Desserts. It couldn't be more simple and it is totally yummy. I have always been a fan of sherbet, especially Rainbow Sherbet: Lindsey Remolif Shere's Nectarine Sherbet has the all festive fun of childhood without the naughty chemicals - the vibrant flavor and playful "sherbet" color are all thanks to mother nature. Does it get better than this?

(Keep in mind that this dessert is only as good as its ingredients - make sure you use sweet, fragrant, ripe nectarines.) 

By the way, I made this sherbet without an ice cream machine, so there's excuse not give this easy recipe a try...


INGREDIENTS - adapted from Chez Panisse Desserts by Lindsey Remolif Shere
  • 1 3/4 pounds ripe nectarines (or peaches)
  • 2 tablespoons water
  • 3/4 cup sugar
  • lemon juice
  • (Shere suggests a splash of kirsch to taste. I didn't use any, although I'm sure it's good.)

First, wash nectarines.

Remove the pits, and rough chop nectarine flesh.  (If you use peaches, Shere suggest removing the peels, but this is not necessary with nectarines.) Place chopped fruit and 2 tablespoons of water into a heavy bottomed sauce pan or dutch oven. Stew nectarines for 10-15 minutes, over low heat, until they are warmed through.

Scoop warmed nectarines into a blender or food processor. You may need to do a couple of batches depending on the size of your blender. Don't fill the blender too high, or you could burn yourself with the hot fruit. Puree until smooth. Add sugar and a squeeze of lemon juice and blend again. Taste for sweetness and add a little more sugar if you think it needs it.

You should have about 3 cups of puree.

(If you have an ice cream maker, go ahead and follow its instructions.)

If you are going old-school, as I did, transfer the puree into a freezable container. I used one of my glass storage bowls that has a lid. Place the covered puree in the fridge until it cools. When the fruit has cooled, put the container in the freezer. Every thirty to forty five minutes, thoroughly stir the fruit mixture. Be sure to especially scrape the frozen bits on the sides of the bowl and keep the mix well integrated, and smooth. (I used a metal soup spoon to do my stirring, but you could also use a whisk, wooden spoon, or even try an egg beater.) After a few hours of freezing and stirring, you are ready to eat.

I hope you enjoy this as much as we did!

Makes about 1 quart. 


WAFFLE POTATOES


I know. I know.

Simple cooking is my thing and what am I doing making my own waffle cut potatoes? Well, my boy Otis, who is just shy of ten, wanted to make dinner for the family. He had a menu in mind... steak, salad with walnuts and his own signature salad dressing, and waffle cut potatoes. How could I deny my boy the fun of cooking this delicious meal? I kept reminding myself that at least the steak and salad were simple enough.

In the end, these potatoes were indeed labor intensive and really really good.  Otis' first dinner party (he invited our neighbors to join us) was an elegant and tasty affair. I was impressed with his ambition and determination....and all of our bellies were very happy.